Some days headband curls are awesome, some days they flop??
I cannot figure out the recipe for greatness yet!

Here's my description on how I do it...
I find that the method with using two headbands makes the curls way too tight, especially at the ends. I believe people with thinner hair may have a similar problem. With one headband and bigger sections, you get what I posted in the pic above. After a thorough brushing, add your moisturizing oil, EOs, aloe, whatever your great hair stuff routine is, then...
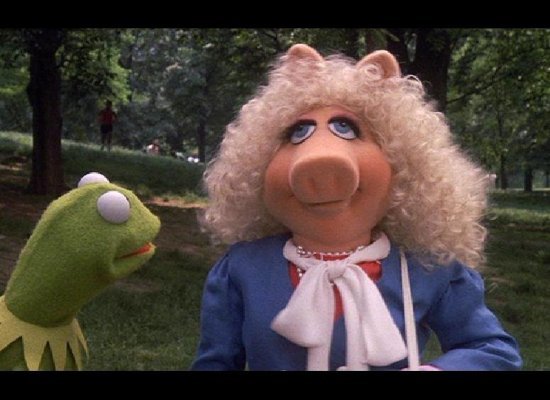 |
| Bad curls.... too tight! |
 |
| Good headband created BOMBSHELL curls! |
Organization is the key. I part my hair and brush everything downward and forward in front of my face. I place the headband at my hairline in the front and baseball cap rim position around my head. I start in the front at the part and take a section or chunk of hair, slip my fingers from my other hand up through the band and catch the section and pull through. Then I add another chunk of hair to the new hanging tail section and even brush it sometimes to keep it neat. I slip my fingers up through the band again going in the direction toward my ears and grab the new thicker chunk and pull down and through. I keep grabbing another chunk or section of hair and add it to the growing tail... as the tail gets thicker because you are adding more hair, the actual curl result becomes thicker in diameter as well, kind of like old fashioned hair rollers. I use a hair pin when I get to almost the back center and make sure I've wrapped all chunks of hair on that side by the time I get to the almost center back.. I secure with a hair pin and leave the tail hanging.
Repeat on the other side, all the time, adding a chunk of hair generally the width of the space available on the hairband for wrapping. When you get tot he center, add a hairpin again. Now join the two tails, brush it out, and slip your fingers up through the hairband in the center back and grab both tails together and pull through neatly. Stick your fingers up through the same hole again and pull through, repeat until you have wrapped your hair to the end. I like to roll the resulting wrap over wrap roll so the ends are against my scalp and pin with two hair pins. I usually remove the first two hairpins at this time as well so they don't get lost!
I sleep on this and find it quite comfortable. I also sleep on a satin pillowcase so I don't get very mush disruption, or any breakage by morning. My hairband is stretchy and thicker, I find it washes well, and may contribute to the bigger bombshell curls that I like, rather than a thin hairband ;)

In the morning, I remove the two hair pins and slowly unwrap the roll over roll in the center. then I allow the side wraps to naturally loosen and just with my finger unroll one wrap at a time along the hairband. There is very little tangling issues and what you see int he pic above is one side unravelled and the hairband is still on my head !
I brush the part and the top of my head with a boar bristle brush and then finger brush the rest of my hair. This lasts ALL day!!! I redo after another good brushing the next night.

These are headband curls at 7pm after a full day at work and them.my Mummy job of little ones as well. I am TIRED, but my hair isn't!
I hope this helps. Here's a video someone posted on YouTube. I like the band she uses because she can untie and pull it through!!
START at 6 minutes...
The canter back is at 8 minutes
The unravel is at 9:16
Styling starts at 11:10
Skip the hairspray - you do't need it :)
No comments:
Post a Comment
Thank you for sharing my journey, all comments are welcomed but will be moderated to ensure we have good vibes going on.